Difference between revisions of "ServerSetup"
(Created page with "== Server Setup == === Setting up with WAMP === ==== Installing WAMP ==== : 1. Download and install WAMP : 2. Start the server by clicking on the '''WampServer64''' icon c...") |
(→Installing WAMP) |
||
| (7 intermediate revisions by the same user not shown) | |||
| Line 1: | Line 1: | ||
| + | [[Project_Meteor_Setup|Return to Project Meteor Setup]] | ||
== Server Setup == | == Server Setup == | ||
| − | + | If you already have your own webserver with php support and a mysql 5.6 or 5.7 server, you can skip installing WAMP. | |
| − | + | === Installing WAMP === | |
| − | + | : 1. Download and install [http://www.wampserver.com/en/#download-wrapper WAMP] | |
| − | |||
| − | : 1. Download and install WAMP | ||
: 2. Start the server by clicking on the '''WampServer64''' icon created by the installer | : 2. Start the server by clicking on the '''WampServer64''' icon created by the installer | ||
: 3. Verify all services are properly started by checking on the '''W''' Icon in the notification bar: | : 3. Verify all services are properly started by checking on the '''W''' Icon in the notification bar: | ||
::* Green: All services started properly | ::* Green: All services started properly | ||
| − | ::* Yellow: Some services started properly | + | ::* Yellow: Some services started properly - this is fine if WAMP has installed multiple conflicting database servers. |
::* Red: All services have stopped | ::* Red: All services have stopped | ||
'''Note:''' Start/restart/stop the WAMP server by clicking on the '''W''' icon and selecting Start/Stop/Restart All Services | '''Note:''' Start/restart/stop the WAMP server by clicking on the '''W''' icon and selecting Start/Stop/Restart All Services | ||
| + | '''Note2:''' Recent versions of WAMP try to package multiple database servers. You do not need to have both MySQL and MariaDB running. In fact, please don't try to make both run. The WAMP icon may not turn green and this is fine so long as Apache and one database server is running. | ||
| + | === Setting Up the Database === | ||
| − | ==== | + | ==== Importing with HeidiSQL ==== |
| − | : 1. Confirm all | + | : 1. Confirm all services are installed and started |
: 2. Download, install, and run HeidiSQL | : 2. Download, install, and run HeidiSQL | ||
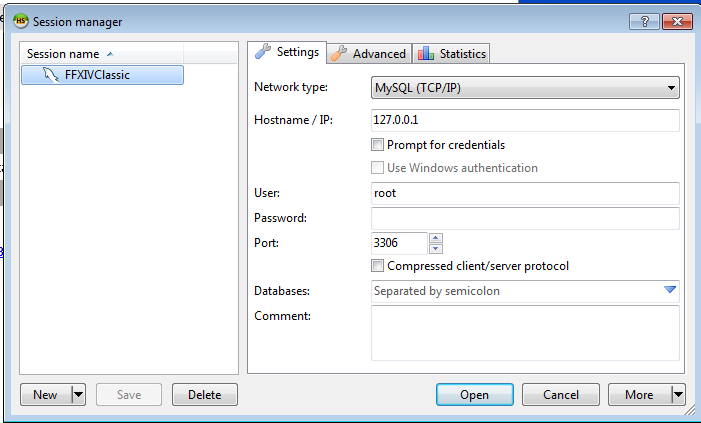
: 3. Select the '''New''' button to create a new connection and select '''Open''' '''Note:''' If the SQL server IP/username/password differ from the defaults, change them here, otherwise continue to the next step | : 3. Select the '''New''' button to create a new connection and select '''Open''' '''Note:''' If the SQL server IP/username/password differ from the defaults, change them here, otherwise continue to the next step | ||
| Line 34: | Line 35: | ||
: 6. Click the new '''ffxiv_server''' database entry | : 6. Click the new '''ffxiv_server''' database entry | ||
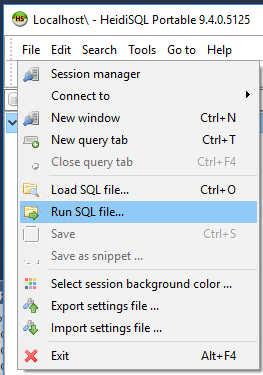
| − | : 7. Go to '''File''' → '''Run SQL File''' and navigate to the '''< | + | : 7. Go to '''File''' → '''Run SQL File''' and navigate to the '''<Project Meteor source code location>\sql\''' folder <br>[[File:Heidi_WAMP_03_Run_SQL.png]] |
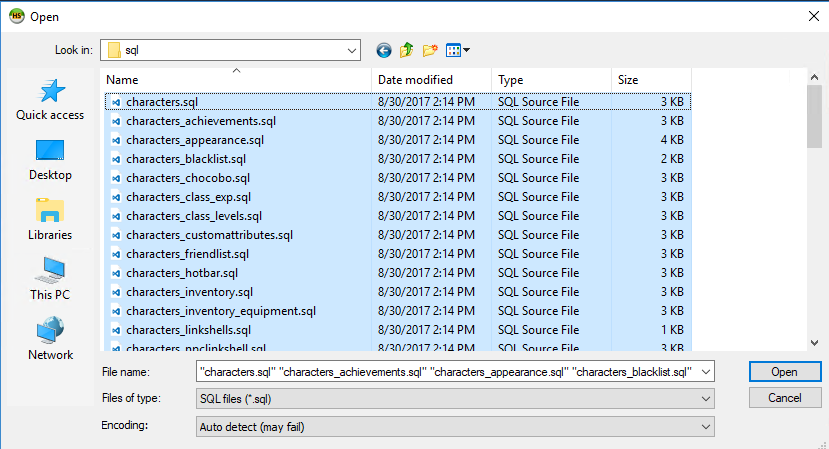
: 8. Select all SQL files in the folder, and execute them. '''Note:''' HeidiSQL may warn you about mixed linebreaks, or an empty warning prompt after executing the query. Ignore them, it'll still run the query successfully. | : 8. Select all SQL files in the folder, and execute them. '''Note:''' HeidiSQL may warn you about mixed linebreaks, or an empty warning prompt after executing the query. Ignore them, it'll still run the query successfully. | ||
: [[File:Heidi_WAMP_04_Select_SQL_file.png]] | : [[File:Heidi_WAMP_04_Select_SQL_file.png]] | ||
| − | ==== Setting Up the Login Server | + | ==== Importing from command line ==== |
| + | : 1. Open the <Project Meteor source location>\sql\import.bat file for editing. | ||
| + | : 2. Adjust the following lines to your local environment or WAMP installation. | ||
| + | <pre>SET PATH_MYSQL="C:\path\to\mysql.exe" | ||
| + | SET PATH_MYSQLADMIN="C:\path\to\mysqladmin.exe" | ||
| + | SET PATH_SQL="<Project Meteor source location>\sql" | ||
| + | |||
| + | SET USER=root | ||
| + | SET PASSWORD= | ||
| + | SET DBADDRESS=localhost | ||
| + | SET DBPORT=3306 | ||
| + | SET DBNAME=ffxiv_server</pre> | ||
| + | :: The default mysql path for WAMP is C:\wamp64\bin\mysql | ||
| + | :: The default WAMP credentials are already in place, as there is no root password. | ||
| + | |||
| + | === Setting Up the Login Server === | ||
: 1. Confirm all WAMP services are running | : 1. Confirm all WAMP services are running | ||
: 2. Navigate to the location of the server source code | : 2. Navigate to the location of the server source code | ||
| − | : 3. Copy the contents of the '''< | + | : 3. Copy the contents of the '''<Project Meteor source location>\www''' folder to the WAMP install location |
:: The default location is: '''C:\wamp64\www''' | :: The default location is: '''C:\wamp64\www''' | ||
: 4. '''OPTIONAL:''' If you have modified the database login settings, change them at: | : 4. '''OPTIONAL:''' If you have modified the database login settings, change them at: | ||
| Line 47: | Line 63: | ||
: 5. Restart the WAMP services | : 5. Restart the WAMP services | ||
| − | + | === Setting up Lobby, World and Map Servers === | |
| − | # '''OPTIONAL:''' If the server and client are on different machines, edit the server IPs in the following locations '''< | + | # '''OPTIONAL:''' If the server and client are on different machines, edit the server IPs in the following locations '''<Project Meteor source location>\data\(lobby/map/world)_config.ini''' '''<SQL database>\ffxiv_server\servers''' '''<SQL database>\ffxiv_server\server_zones''' *if the map servers are not on the same server as world server |
| − | # Copy '''lobby_config.ini''' from '''< | + | # Copy '''lobby_config.ini''' from '''<Project Meteor source location>/data/''' |
| − | #: to '''< | + | #: to '''<Project Meteor source location>\Lobby Server\bin\(Debug\Release)\''' |
| − | # Copy '''map_config.ini''', '''staticactors.bin''' and the '''scripts''' folder from '''< | + | # Copy '''map_config.ini''', '''staticactors.bin''' and the '''scripts''' folder from '''<Project Meteor source location>/data/''' |
| − | #: to '''< | + | #: to '''<Project Meteor source location>\Map Server\bin\(Debug\Release)\''' |
| − | # Copy '''world_config.ini''' from '''< | + | # Copy '''world_config.ini''' from '''<Project Meteor source location>/data/''' |
| − | #: to '''< | + | #: to '''<Project Meteor source location>\World Server\bin\(Debug\Release)\''' |
| − | |||
| − | |||
| − | |||
| − | |||
| − | |||
| − | |||
| − | |||
| − | |||
| − | |||
| − | |||
| − | |||
| − | |||
| − | |||
| − | |||
| − | |||
| − | |||
| − | |||
| − | |||
| − | |||
| − | |||
| − | + | Alternatively, download the [https://wiki.ffxivrp.org/postbuild_copy.bat postbuild_copy.bat] file and place it into your Data folder. It will attempt to copy all required files to their default build locations. | |
| − | |||
| − | |||
| − | |||
| − | |||
| − | |||
| − | |||
| − | |||
| − | |||
=== Starting the servers === | === Starting the servers === | ||
: 1. Confirm all WAMP/web services are running | : 1. Confirm all WAMP/web services are running | ||
| − | : 2. Run the lobby server: '''< | + | : 2. Run the lobby server: '''<Project Meteor source location>\Lobby Server\bin\(Debug\Release)\Lobby Server.exe''' |
| − | : 3. Run the map server: '''< | + | : 3. Run the map server: '''<Project Meteor source location>\Map Server\bin\(Debug\Release)\Map Server.exe''' |
| − | : 4. Run the map server: '''< | + | : 4. Run the map server: '''<Project Meteor source location>\World Server\bin\(Debug\Release)\World Server.exe''' |
| + | |||
| + | [[Project_Meteor_Setup|Return to Project Meteor Setup]] | ||
Latest revision as of 04:02, 25 March 2021
Return to Project Meteor Setup
Contents
Server Setup
If you already have your own webserver with php support and a mysql 5.6 or 5.7 server, you can skip installing WAMP.
Installing WAMP
- 1. Download and install WAMP
- 2. Start the server by clicking on the WampServer64 icon created by the installer
- 3. Verify all services are properly started by checking on the W Icon in the notification bar:
- Green: All services started properly
- Yellow: Some services started properly - this is fine if WAMP has installed multiple conflicting database servers.
- Red: All services have stopped
Note: Start/restart/stop the WAMP server by clicking on the W icon and selecting Start/Stop/Restart All Services
Note2: Recent versions of WAMP try to package multiple database servers. You do not need to have both MySQL and MariaDB running. In fact, please don't try to make both run. The WAMP icon may not turn green and this is fine so long as Apache and one database server is running.
Setting Up the Database
Importing with HeidiSQL
- 1. Confirm all services are installed and started
- 2. Download, install, and run HeidiSQL
- 3. Select the New button to create a new connection and select Open Note: If the SQL server IP/username/password differ from the defaults, change them here, otherwise continue to the next step

- 4. Verify you are connected: A newly set up/blank mysql server should have the following databases listed:
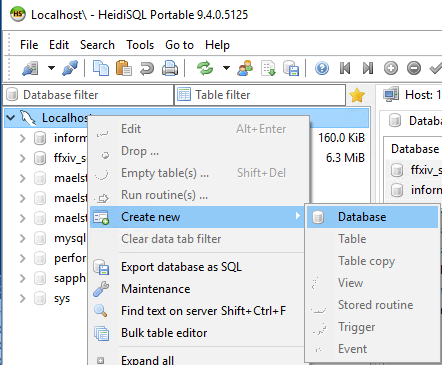
Default tables information_schema mysql performance_schema sys
- 5. Right Click Unnamed and go to Create new → Database and name the new database: ffxiv_server Note: If you changed the name of the server in step 3, the name will be that instead of Unnamed

- 6. Click the new ffxiv_server database entry
- 7. Go to File → Run SQL File and navigate to the <Project Meteor source code location>\sql\ folder

- 8. Select all SQL files in the folder, and execute them. Note: HeidiSQL may warn you about mixed linebreaks, or an empty warning prompt after executing the query. Ignore them, it'll still run the query successfully.

Importing from command line
- 1. Open the <Project Meteor source location>\sql\import.bat file for editing.
- 2. Adjust the following lines to your local environment or WAMP installation.
SET PATH_MYSQL="C:\path\to\mysql.exe"
SET PATH_MYSQLADMIN="C:\path\to\mysqladmin.exe"
SET PATH_SQL="<Project Meteor source location>\sql"

SET USER=root
SET PASSWORD=
SET DBADDRESS=localhost
SET DBPORT=3306
SET DBNAME=ffxiv_server
- The default mysql path for WAMP is C:\wamp64\bin\mysql
- The default WAMP credentials are already in place, as there is no root password.
Setting Up the Login Server
- 1. Confirm all WAMP services are running
- 2. Navigate to the location of the server source code
- 3. Copy the contents of the <Project Meteor source location>\www folder to the WAMP install location
- The default location is: C:\wamp64\www
- 4. OPTIONAL: If you have modified the database login settings, change them at:
- <web server www folder>\login_su\config.php
- 5. Restart the WAMP services
Setting up Lobby, World and Map Servers
- OPTIONAL: If the server and client are on different machines, edit the server IPs in the following locations <Project Meteor source location>\data\(lobby/map/world)_config.ini <SQL database>\ffxiv_server\servers <SQL database>\ffxiv_server\server_zones *if the map servers are not on the same server as world server
- Copy lobby_config.ini from <Project Meteor source location>/data/
- to <Project Meteor source location>\Lobby Server\bin\(Debug\Release)\
- Copy map_config.ini, staticactors.bin and the scripts folder from <Project Meteor source location>/data/
- to <Project Meteor source location>\Map Server\bin\(Debug\Release)\
- Copy world_config.ini from <Project Meteor source location>/data/
- to <Project Meteor source location>\World Server\bin\(Debug\Release)\
Alternatively, download the postbuild_copy.bat file and place it into your Data folder. It will attempt to copy all required files to their default build locations.
Starting the servers
- 1. Confirm all WAMP/web services are running
- 2. Run the lobby server: <Project Meteor source location>\Lobby Server\bin\(Debug\Release)\Lobby Server.exe
- 3. Run the map server: <Project Meteor source location>\Map Server\bin\(Debug\Release)\Map Server.exe
- 4. Run the map server: <Project Meteor source location>\World Server\bin\(Debug\Release)\World Server.exe