Difference between revisions of "Compiling"
m |
|||
| (3 intermediate revisions by the same user not shown) | |||
| Line 1: | Line 1: | ||
| + | [[Project_Meteor_Setup|Return to Project Meteor Setup]] | ||
== Compiling from source == | == Compiling from source == | ||
| Line 8: | Line 9: | ||
! Support Level | ! Support Level | ||
! Notes | ! Notes | ||
| + | |- | ||
| + | | Visual Studio 2019 | ||
| + | | style="background: green; color: white; text-align: center;" | Officially supported | ||
| + | | Users will need to manually select the NuGet and <br> | ||
| + | All .Net 4.5 and 4.6 modules when installing. | ||
|- | |- | ||
| Visual Studio 2017 | | Visual Studio 2017 | ||
| Line 42: | Line 48: | ||
{{clear}} | {{clear}} | ||
| − | |||
| − | |||
| − | |||
| − | |||
=== Compiling === | === Compiling === | ||
| Line 51: | Line 53: | ||
==== Getting the Source Code ==== | ==== Getting the Source Code ==== | ||
<div style="padding-left:2em;"> | <div style="padding-left:2em;"> | ||
| − | ===== Via | + | ===== Via git client===== |
: 1. Download and install SourceTree | : 1. Download and install SourceTree | ||
| − | : 2. | + | : 2. Choose to clone https://bitbucket.org/Ioncannon/project-meteor-server.git |
: 3. Select folder to clone source code to | : 3. Select folder to clone source code to | ||
| + | : 4. Make sure to switch to the '''develop''' branch | ||
===== Manually via Bitbucket ===== | ===== Manually via Bitbucket ===== | ||
: 1. Go to the [https://bitbucket.org/Ioncannon/project-meteor-server.git Server source code] | : 1. Go to the [https://bitbucket.org/Ioncannon/project-meteor-server.git Server source code] | ||
: 2. Click the "Downloads" button on the sidebar | : 2. Click the "Downloads" button on the sidebar | ||
| − | : 3. Click " | + | : 3. Click "Branches" |
| − | : 4. Extract to desired folder | + | : 4. Download an archive for the '''develop''' branch (unless you specifically need a different one) |
| + | : 5. Extract to desired folder | ||
==== Pre-Compilation Steps ==== | ==== Pre-Compilation Steps ==== | ||
| Line 83: | Line 87: | ||
<code> ========== Build: 5 succeeded, 0 failed, 0 up-to-date, 0 skipped ========== </code> | <code> ========== Build: 5 succeeded, 0 failed, 0 up-to-date, 0 skipped ========== </code> | ||
</div> | </div> | ||
| + | |||
| + | [[Project_Meteor_Setup|Return to Project Meteor Setup]] | ||
Latest revision as of 03:53, 25 March 2021
Return to Project Meteor Setup
Contents
Compiling from source
Compiler Requirements
| Name | Support Level | Notes |
|---|---|---|
| Visual Studio 2019 | Officially supported | Users will need to manually select the NuGet and All .Net 4.5 and 4.6 modules when installing. |
| Visual Studio 2017 | Officially supported | Users will need to manually select the NuGet and All .Net 4.5 and 4.6 modules when installing. |
| Visual Studio 2015 | Officially supported | |
| Visual Studio 2013 | Works/Unsupported | Users may need to install a modern compiler via NuGet, or will receive errors from the source. |
| Visual Studio 2012 (or older) | Unsupported |
| Name | Version |
|---|---|
| NuGet 3.4 (or newer) | Officially supported |
| NET Framework 4.5 | Officially supported |
Compiling
Getting the Source Code
Via git client
- 1. Download and install SourceTree
- 2. Choose to clone https://bitbucket.org/Ioncannon/project-meteor-server.git
- 3. Select folder to clone source code to
- 4. Make sure to switch to the develop branch
Manually via Bitbucket
- 1. Go to the Server source code
- 2. Click the "Downloads" button on the sidebar
- 3. Click "Branches"
- 4. Download an archive for the develop branch (unless you specifically need a different one)
- 5. Extract to desired folder
Pre-Compilation Steps
- 1. Navigate to the location the game client has been installed to and copy the following file:
- <FINAL FANTASY XIV client install location>\client\script\rq9q1797qvs.san
- 2. Navigate to the location of the server source code and rename rq9q1797qvs.san to:
- <Project Meteor Server source location>\data\staticactors.bin
Building
- 1. Set up your compile environment/IDE to support compiling NET 4.5 (the 4.5.2 and 4.6 targetting packs are being used as of this writing.)
- 2. Open Meteor.sln from where the source code was copied to in the previous steps
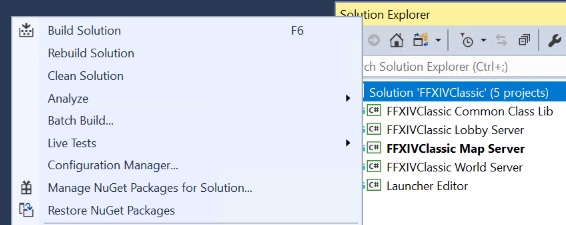
- 3. Get the dependencies via NuGet
- 4. Select Debug/Release (as desired)
- 5. Go to the Build Menu and select Build Solution
- Note: You do not need to do this step until you have finished configuring your server below
- 6. If everything compiled correctly, the output log should look like:
========== Build: 5 succeeded, 0 failed, 0 up-to-date, 0 skipped ==========
